Skip to content

Changelog

New updates and improvements at Cloudflare.

Introducing Web Search API

Web Search API is now available in beta. Web Search API lets your AI agents and applications search the Internet and ground their responses in live information, instead of guessing URLs or relying on a model's training cutoff.

At launch, you can choose between three search providers: Ceramic.ai, Exa, and Linkup. All three support Zero Data Retention for requests made through Cloudflare, and all have committed to Cloudflare's verified bot crawling standards.

Web Search API runs through AI Gateway, so search requests appear in your gateway logs and are billed to your AI Gateway credits at each provider's list API price, with no additional markup. You can also bring your own provider API key.

Call Web Search API with the REST API:

curl https://api.cloudflare.com/client/v4/accounts/$CLOUDFLARE_ACCOUNT_ID/ai/websearch/ \
  --request POST \
  --header "Authorization: Bearer $CLOUDFLARE_API_TOKEN" \
  --header "Content-Type: application/json" \
  --data '{
    "query": "What are some fun things to do in Salt Lake City as fall approaches?",
    "provider": "ceramic",
    "limit": 5,
    "options": { "gateway": { "id": "default" } }
  }'

Or from a Worker with the AI binding:

const response = await env.AI.websearch({
	gatewayId: "default",
	query: "What are some fun things to do in Salt Lake City as fall approaches?",
	provider: "exa",
	limit: 5,
});

const results = await response.json();

To get started, refer to How to use Web Search API.

Run the Pi Durable harness on Cloudflare with the Agents SDK

The Agents SDK now provides first-class support for building agents using the Pi harness. You can build long-running agents using the combination of Pi 1.0 ↗︎, Pi Durable ↗︎, and the new PiHarness class that the Cloudflare Agents SDK provides, ensuring your agent's work is durably persisted, even if interrupted mid-turn.

Built with Earendil ↗︎, this integration is our first step toward first-class support for third-party agent harnesses on Cloudflare.

Deploy to Cloudflare

PiHarness is a new "Lifecycle capability" provided by the Cloudflare Agents SDK. Pi Durable provides the agent harness and the Lifecycle is responsible for keeping the agent running in the Durable Object. The Lifecycle is a core concept in the Agents SDK ensuring that long-running work can run in a Durable Object, surviving restarts, crashes, and network issues. We will share more on Lifecycle capabilities in the near future.

Install

npm i agents@latest @earendil-works/pi-durable @earendil-works/pi-ai

Both Pi packages are optional peer dependencies of agents, so you only install them if you use the harness.

Use it in an Agent

Creating a Pi agent requires configuring the Pi Harness with a model, skills, and tools, then registering the PiHarness with the Agent class.

import { Agent } from "agents";
import { createModels } from "@earendil-works/pi-ai/models";
import { createRegistry, Harness } from "@earendil-works/pi-durable";
import { PiHarness } from "agents/harness/pi";
import { createAI } from "agents/models/pi-ai";

export class Assistant extends Agent {
	ai = createAI({ binding: this.env.AI });
	registry = createRegistry();

	harness = new PiHarness({
		harness: ({ storage, context }) => {
			const models = createModels();
			models.setProvider(this.ai.provider);
			return Harness.open(
				storage,
				{ models, registry: this.registry },
				context,
			);
		},
		defaults: { model: this.ai("@cf/moonshotai/kimi-k2.7-code") },
	});

	constructor(ctx, env) {
		super(ctx, env);
		this.lifecycle.use(this.harness);
	}

	async ask(prompt) {
		const { text } = await this.harness.prompt(prompt);
		return text;
	}
}
import { Agent } from "agents";
import { createModels } from "@earendil-works/pi-ai/models";
import { createRegistry, Harness } from "@earendil-works/pi-durable";
import { PiHarness } from "agents/harness/pi";
import { createAI } from "agents/models/pi-ai";

export class Assistant extends Agent<Env> {
	ai = createAI({ binding: this.env.AI });
	registry = createRegistry();

	harness = new PiHarness({
		harness: ({ storage, context }) => {
			const models = createModels();
			models.setProvider(this.ai.provider);
			return Harness.open(
				storage,
				{ models, registry: this.registry },
				context,
			);
		},
		defaults: { model: this.ai("@cf/moonshotai/kimi-k2.7-code") },
	});

	constructor(ctx: DurableObjectState, env: Env) {
		super(ctx, env);
		this.lifecycle.use(this.harness);
	}

	async ask(prompt: string) {
		const { text } = await this.harness.prompt(prompt);
		return text;
	}
}

The agents/models/pi-ai entry point supports AI Gateway and Workers AI models, so you can get started with Cloudflare models right away or use your existing pi-ai provider.

Add tools with extensions

Both tools and system prompt sections are provided to the Pi Harness via extensions.

import { Type } from "@earendil-works/pi-ai";

import { skills } from "agents/harness/pi";

const WordCount = Type.Object({ text: Type.String() });

const wordCount = {
	name: "word_count",
	description: "Count the words in a text.",
	parameters: WordCount,
	replay: "safe",
	async execute({ text }) {
		const words = text.split(/\s+/).filter(Boolean).length;
		return { content: [{ type: "text", text: String(words) }] };
	},
};

// In the harness factory, before Harness.open():
registry.install({
	name: "editor",
	sections: [
		{ key: "preamble", render: () => "You are an editor.", tag: false },
	],
	tools: [wordCount],
});
registry.install(await skills(sources));
import { Type } from "@earendil-works/pi-ai";
import type { ToolRegistration } from "@earendil-works/pi-durable";
import { skills } from "agents/harness/pi";

const WordCount = Type.Object({ text: Type.String() });

const wordCount: ToolRegistration<typeof WordCount> = {
	name: "word_count",
	description: "Count the words in a text.",
	parameters: WordCount,
	replay: "safe",
	async execute({ text }) {
		const words = text.split(/\s+/).filter(Boolean).length;
		return { content: [{ type: "text", text: String(words) }] };
	},
};

// In the harness factory, before Harness.open():
registry.install({
	name: "editor",
	sections: [
		{ key: "preamble", render: () => "You are an editor.", tag: false },
	],
	tools: [wordCount],
});
registry.install(await skills(sources));

For more information on creating and configuring extensions, refer to Extensions.

Learn more

Introducing Clef: Cloudflare's first open-source decision models, now on Workers AI

Meet @cf/cloudflare/clef and @cf/cloudflare/clef-flash, the first models trained by the Cloudflare Workers AI team, available on Workers AI today.

Clef is a decision model, in the same family as Typesafe's Jev ↗︎. Instead of generating text, it reads an input state and a set of typed questions, then returns a probability for every allowed answer. Your agent gets a structured decision it can act on immediately, for example: route the ticket, block the request, or escalate to a human. There is no free-form output to parse and no reasoning tokens to wait for.

Both models are hosted on Workers AI as Clef and Clef-flash. We are also open-sourcing the weights under the Apache 2.0 license on Hugging Face: Clef ↗︎ and Clef-flash ↗︎. Read the launch blog post ↗︎ for the full story, including how we trained them.

We are also launching a reinforcement learning (RL) fine-tuning service to help you tune Clef for your own workloads. Sign up to work with us as a design partner ↗︎.

Built for the hot path

Clef is designed to be fast so decisions come back in milliseconds. Across our 43 benchmark runs, we achieved speeds where Clef is 2.5x faster than Jev at the median, and Clef-flash 13x faster.

Latency Clef Clef-flash Jev
Median 209.3 ms 38.8 ms 524.1 ms
p95 238.6 ms 122.4 ms 536.0 ms

Hosting on Workers AI adds to that speed. Requests run on GPUs across Cloudflare's network, running close to your users, so the network round trip stays short. You can put Clef directly in the request path of your agent, then hand off to an LLM on Workers AI to take action.

Leading the benchmarks

Across 10 decision benchmarks, a Clef model scores highest on 7, ahead of Jev and other open decision models. A few highlights:

Benchmark Clef Clef-flash Jev
BFCL (case exact) 98.47 98.76 95.75
BANKING77 (macro-F1) 94.20 90.93 79.74
CLINC150+OOS (macro-F1) 97.43 66.77 89.27
Home appliances (case exact) 82.95 97.73 52.27

On Typesafe's own workflow evals, Clef beats Jev in 3 of 4 areas: invoice processing, customer service, and security incidents. The full results are on the Hugging Face model card ↗︎.

Drop-in compatible with Jev

Model Size Best for Context window
@cf/cloudflare/clef 27B Highest-precision decisions 64K tokens
@cf/cloudflare/clef-flash 9B Latency-critical, hot-path decisions 64K tokens

Clef follows the System One API, so you can switch an existing Jev integration to Clef by changing the endpoint and model. Ask up to 64 questions per request, in three types:

  • noul: A yes/no question. Returns the probability that the answer is yes.
  • choice: Pick one option from a set you define. Returns the chosen option, a probability per option, and a confidence value.
  • score: Rate against an ordered rubric. Returns a probability-weighted score and a probability per level.
const response = await env.AI.run("@cf/cloudflare/clef", {
	model: "clef",
	state: "Checkout has been failing for every customer for the last hour.",
	questions: {
		urgent: {
			type: "noul",
			instructions: "Is this support request urgent?",
		},
		team: {
			type: "choice",
			instructions: "Which team should handle this request?",
			criteria: {
				billing: "Payments, invoices, and refunds",
				technical: "Outages, errors, and configuration",
				sales: "Plans and upgrades",
			},
		},
	},
});

// response.answers.urgent.noul -> probability the request is urgent
// response.answers.team.choice -> highest-probability team
const response = await env.AI.run("@cf/cloudflare/clef", {
	model: "clef",
	state: "Checkout has been failing for every customer for the last hour.",
	questions: {
		urgent: {
			type: "noul",
			instructions: "Is this support request urgent?",
		},
		team: {
			type: "choice",
			instructions: "Which team should handle this request?",
			criteria: {
				billing: "Payments, invoices, and refunds",
				technical: "Outages, errors, and configuration",
				sales: "Plans and upgrades",
			},
		},
	},
});

// response.answers.urgent.noul -> probability the request is urgent
// response.answers.team.choice -> highest-probability team

What you can build with decision models

  • Support triage: Decide whether a ticket is urgent and which team owns it, then route it without a human in the loop.
  • Threat intelligence: Classify a website by category. Paired with Browser Run, Clef fetched, rendered, and classified a domain in 2.2 seconds, compared to 4.7 seconds for gpt-oss-120b in the same workflow.
  • Trust and safety: Score user submissions against your own policy rubric and act on the probability.
  • Agent guardrails: Let an agent check "should I take this action?" in tens of milliseconds before calling a tool.
  • Visual classification: Pass up to four images alongside the state. Unlike text-only decision models, Clef has a vision encoder.

Get started

Use Clef through the Workers AI binding (env.AI.run()) or the REST API at /ai/run. You can also use AI Gateway with these endpoints.

For more information, refer to the Clef model page, the Clef-flash model page, and pricing.

The best way to do MCP auth just got better: Workers OAuth Provider goes v1, with a new split API and full support for MCP 2026-07-28

@cloudflare/workers-oauth-provider ↗︎ is now v1, with a new split API. One Worker acts as the authorization server: it signs users in and issues tokens. Your MCP server acts as the resource server, and can run in another Worker. It validates each token with the authorization server over a Service Binding, without crossing the public Internet.

The split API

import {
	OAuthAuthorizationServer,
	OAuthResourceServer,
	insufficientScope,
} from "@cloudflare/workers-oauth-provider";
import { WorkerEntrypoint } from "cloudflare:workers";

// auth-server Worker: signs users in and issues tokens for both MCP servers.
const authorizationServer = new OAuthAuthorizationServer({
	issuer: "https://auth.example.com",
	resources: [
		"https://calendar.example.com/mcp",
		"https://drive.example.com/mcp",
	],
	scopesSupported: ["calendar:read", "calendar:write", "offline_access"],
	clientIdMetadataDocumentEnabled: true,
});

export class AuthServer extends WorkerEntrypoint {
	fetch(request) {
		if (new URL(request.url).pathname === "/authorize") {
			return showConsent(request, this.env);
		}
		return authorizationServer.fetch(request, this.env, this.ctx);
	}

	validateToken(resource, token) {
		return authorizationServer.validateToken(resource, token, this.env);
	}
}

// calendar MCP Worker: checks tokens with AuthServer over a Service Binding.
export const calendar = new OAuthResourceServer({
	resourceMetadata: {
		resource: "https://calendar.example.com/mcp",
		authorization_servers: ["https://auth.example.com"],
	},
	requiredScopes: ["calendar:read"],
	validateToken: (env) => env.AUTH_SERVER.validateToken,
	handler: {
		fetch(request, env, ctx) {
			if (
				request.method === "POST" &&
				!ctx.auth.scope.includes("calendar:write")
			) {
				return insufficientScope(ctx.auth, ["calendar:read", "calendar:write"]);
			}
			return handleMcp(request, ctx.props);
		},
	},
});
import {
	OAuthAuthorizationServer,
	OAuthResourceServer,
	insufficientScope,
} from "@cloudflare/workers-oauth-provider";
import { WorkerEntrypoint } from "cloudflare:workers";

// auth-server Worker: signs users in and issues tokens for both MCP servers.
const authorizationServer = new OAuthAuthorizationServer<Env>({
	issuer: "https://auth.example.com",
	resources: [
		"https://calendar.example.com/mcp",
		"https://drive.example.com/mcp",
	],
	scopesSupported: ["calendar:read", "calendar:write", "offline_access"],
	clientIdMetadataDocumentEnabled: true,
});

export class AuthServer extends WorkerEntrypoint<Env> {
	fetch(request: Request) {
		if (new URL(request.url).pathname === "/authorize") {
			return showConsent(request, this.env);
		}
		return authorizationServer.fetch(request, this.env, this.ctx);
	}

	validateToken(resource: string, token: string) {
		return authorizationServer.validateToken(resource, token, this.env);
	}
}

// calendar MCP Worker: checks tokens with AuthServer over a Service Binding.
export const calendar = new OAuthResourceServer<Env, AuthProps>({
	resourceMetadata: {
		resource: "https://calendar.example.com/mcp",
		authorization_servers: ["https://auth.example.com"],
	},
	requiredScopes: ["calendar:read"],
	validateToken: (env) => env.AUTH_SERVER.validateToken,
	handler: {
		fetch(request, env, ctx) {
			if (
				request.method === "POST" &&
				!ctx.auth.scope.includes("calendar:write")
			) {
				return insufficientScope(ctx.auth, ["calendar:read", "calendar:write"]);
			}
			return handleMcp(request, ctx.props);
		},
	},
});

In the example, env.AUTH_SERVER.validateToken is that Service Binding call. The calendar Worker needs no KV namespace of its own.

{
	"name": "calendar-mcp",
	"main": "src/index.ts",
	// Set this to today's date
	"compatibility_date": "2026-10-05",
	"services": [
		{
			"binding": "AUTH_SERVER",
			"service": "auth-server",
			"entrypoint": "AuthServer",
		},
	],
}
name = "calendar-mcp"
main = "src/index.ts"
# Set this to today's date
compatibility_date = "2026-10-05"

[[services]]
binding = "AUTH_SERVER"
service = "auth-server"
entrypoint = "AuthServer"

OAuthResourceServer publishes the RFC 9728 ↗︎ protected resource metadata that MCP clients use to find your authorization server. It answers requests without a token with a 401 challenge that points to that metadata. It also rejects tokens issued for any other resource.

You can still use OAuthProvider as both the authorization server and the MCP server. For most 0.x deployments, the only required change is to add resourceMetadata: { resource }.

Other updates and helpers

Upgrade with the migration skill

npm i @cloudflare/workers-oauth-provider@latest

Point your coding agent at node_modules/@cloudflare/workers-oauth-provider/skills/migrate-to-1.0/SKILL.md, or follow the migration guide ↗︎.

For both Workers in full, refer to the split Workers example ↗︎.

AI Search is generally available

AI Search is now generally available. Usage-based billing begins on November 1, 2026, with included monthly ingestion, storage, semantic query, and full-text query usage. Cloudflare will send a reminder email the week before billing begins.

Refer to Limits & pricing for rates and included usage.

Hybrid search is on by default

New AI Search instances use hybrid search by default. Hybrid search combines semantic vector retrieval with full-text matching. You can choose a different index method when you create an instance.

Refer to Hybrid search for details.

Workers AI embeddings and reranking are included

Workers AI embedding and reranking calls made by AI Search are included in AI Search pricing. These calls no longer appear on your Workers AI bill or in your AI Gateway logs. Generation, query rewriting, and external providers continue to use your account and gateway.

Refer to Limits & pricing for details.

Multimodal model and image support

AI Search supports the @cf/qwen/qwen3-vl-embedding-2b and google-ai-studio/gemini-embedding-2 multimodal embedding models. Search and chat requests can include images through the REST API and public endpoint.

Refer to Supported models for the full list of embedding models.

OCR availability and increased file limits

Optical character recognition (OCR) is available on every account for scanned PDFs. Plain-text or code files and PDFs with OCR enabled can be up to 10 MiB. PDFs without OCR and other supported formats remain limited to 4 MiB.

Refer to Data source for file limits and Limits & pricing for OCR pricing.

Source type inference

When you create an AI Search instance, the type field is optional. AI Search infers a website source from an HTTP or HTTPS URL, or an R2 source from an existing bucket name.

Refer to Data source for details.

Sandbox SDK 1.0: control every sandbox from your own Durable Object

Sandbox SDK 1.0 is available. Your own Durable Object class now controls each sandbox container directly, through the Durable Object container API on this.ctx.container.

With 1.0, your class can:

  • Choose the image and instance size each time it starts a sandbox. One class can run sandboxes on different images, and a deploy does not restart sandboxes that are running.
  • Save the files of a sandbox as a snapshot, in public beta, and start the same sandbox or a new one from it.
  • Decide when each sandbox stops, for example when a task finishes, when its user goes idle, or after it saves a snapshot.
  • Run commands with streamed input and output, send them signals, and open terminals.
  • Serve previews from ports in the sandbox, with your own hostnames and authentication.
  • Handle outbound requests for each hostname in Worker code, so credentials and bindings stay in your Worker.
  • Expose only the methods that you want callers to use.
  • Run an agent in the same Durable Object, and give the model a tool that runs commands in the sandbox.
src/index.jsjs
import { Files } from "@cloudflare/sandbox";
import { DurableObject } from "cloudflare:workers";

export class MySandbox extends DurableObject {
	container;
	files;

	constructor(ctx, env) {
		super(ctx, env);
		if (!ctx.container) {
			throw new Error("No container is configured");
		}
		this.container = ctx.container;
		this.files = new Files(ctx.container);
	}

	async run(script) {
		if (!this.container.running) {
			// Your code chooses the image, size, and network access.
			this.container.start({
				image: this.container.images.sandbox,
				instance: "lite",
				enableInternet: false,
			});
		}

		await this.files.writeFile("/tmp/task.sh", script);
		const proc = await this.container.exec(["sh", "/tmp/task.sh"]);
		return proc.output();
	}
}
src/index.tsts
import { Files } from "@cloudflare/sandbox";
import { DurableObject } from "cloudflare:workers";

export class MySandbox extends DurableObject<Env> {
	private readonly container: Container;
	private readonly files: Files;

	constructor(ctx: DurableObjectState, env: Env) {
		super(ctx, env);
		if (!ctx.container) {
			throw new Error("No container is configured");
		}
		this.container = ctx.container;
		this.files = new Files(ctx.container);
	}

	async run(script: string) {
		if (!this.container.running) {
			// Your code chooses the image, size, and network access.
			this.container.start({
				image: this.container.images.sandbox,
				instance: "lite",
				enableInternet: false,
			});
		}

		await this.files.writeFile("/tmp/task.sh", script);
		const proc = await this.container.exec(["sh", "/tmp/task.sh"]);
		return proc.output();
	}
}

Your class uses the container API directly, with the durable_object scheduling policy and container snapshots, both in public beta. @cloudflare/sandbox adds classes for work that the API does not include:

  • Files streams files in and out of the running sandbox.
  • S3Mount mounts an S3-compatible bucket, such as R2. Your Worker signs each storage request, so the credentials stay out of the sandbox.
  • DirectoryBackup saves a directory to R2 and restores it into any sandbox, including one on a newer image.

If you use Sandbox SDK 0.x

Your 0.x applications keep running, and @cloudflare/sandbox 0.x stays on npm. Sandbox SDK 0.x receives bug and security fixes until 2026-12-31, and its documentation stays at Sandbox SDK 0.x.

When you are ready, Migrate from Sandbox SDK 0.x shows the 1.0 code for each 0.x feature, including preview URLs, tunnels, background processes, terminals, backups, and the code interpreter. The guide keeps the preview URLs and named tunnels that your 0.x application created working. You can move every sandbox in one deploy, or run a 1.0 class next to your 0.x class and move sandboxes one at a time. The deploy that moves an existing class to the new policy is one-way, so the guide shows how to rehearse it first.

The Sandboxes documentation also covers Dynamic Workers, for untrusted code in JavaScript, Python, or WebAssembly.

Pay for AI inference with Machine Payments

AI Gateway now supports Machine Payments in beta. With Machine Payments, clients can use the x402 protocol to pay for eligible inference requests directly from a stablecoin wallet instead of maintaining a prepaid credit balance.

Machine Payments is available for the /ai/run endpoint with select open models. To request x402 payment, authenticate with a Cloudflare API token and include the Cloudflare-specific Payment-Method: x402 header:

curl -iX POST "https://api.cloudflare.com/client/v4/accounts/$CLOUDFLARE_ACCOUNT_ID/ai/run" \
  --header "Authorization: Bearer $CLOUDFLARE_API_TOKEN" \
  --header "Payment-Method: x402" \
  --header "Content-Type: application/json" \
  --data '{
    "model": "z-ai/glm-4.7-flash",
    "input": {
      "messages": [
        {
          "role": "user",
          "content": "What is Cloudflare?"
        }
      ]
    }
  }'

An x402-compatible client handles the payment challenge, signs an authorization from the client's wallet, and retries the request. Machine Payments currently requires customers to be based in the United States and have a credit card on file.

For prerequisites, eligible models, and transaction details, refer to Machine Payments (x402).

Monetization Gateway closed beta

Monetization Gateway is now available in closed beta. Sellers can use it to charge agents for access to APIs, Model Context Protocol (MCP) tools, sites, and datasets.

Sellers (domain owners) define which requests require payment, the cost, and where the payment should be sent. Buyers receive the payment instructions, sign an authorization, and receive the resource after the payment has been settled. The Monetization Gateway uses the x402 protocol to handle payment authorization within the HTTP request flow.

To learn more, request access in the Cloudflare dashboard ↗︎, review the Monetization Gateway documentation, or read the blog ↗︎.

Identify model overuse and potential savings with User Insights

AI Gateway User Insights now gives you more context about the traffic flowing through your gateway. It shows what users and agents are doing with AI, and where a selected model may be more capable than a task requires.

On the analysis side, User Insights groups conversations by task, tracks conversation turns, and helps you compare model fit with cost and latency.

User Insights task and model analysis grouped by task categories

The Potential Savings view highlights requests that may work with faster or less expensive models without compromising output quality. These are the same signals that Cloudflare's Auto Router uses to select a model based on task and cost.

Potential Savings view comparing tasks and suggested models

These new insights are available to all AI Gateway customers at no additional cost. For more information, refer to User Insights.

Connect multiple clients to one Browser Run session

Browser Run sessions now accept multiple concurrent connections. Before, a session accepted only one connection at a time, and other Workers had to wait until that connection closed. Now multiple Workers can connect to the same browser at the same time.

Each puppeteer.connect() call opens its own Chrome DevTools Protocol (CDP) connection. Create a separate browser context for each request to keep its pages, cookies, and storage apart from other clients.

const browser = await puppeteer.connect(env.MYBROWSER, sessionId);
const context = await browser.createBrowserContext();

try {
	const page = await context.newPage();
	await page.goto("https://example.com");
	// ...
} finally {
	await context.close();
	await browser.disconnect(); // keep the shared browser running
}
const browser = await puppeteer.connect(env.MYBROWSER, sessionId);
const context = await browser.createBrowserContext();

try {
	const page = await context.newPage();
	await page.goto("https://example.com");
	// ...
} finally {
	await context.close();
	await browser.disconnect(); // keep the shared browser running
}

Sharing sessions means fewer new browsers to launch, less cold-start time, and fewer concurrent browsers counted against your limits.

Concurrent connections require @cloudflare/puppeteer version 1.1.0 or later.

Refer to Reuse sessions for a full example.

Browser Run adds WebMCP to Kitesurf and moves to document.modelContext

WebMCP now works in Kitesurf sessions as well as Lab sessions. Both backends use the document.modelContext API from the WebMCP Community Group draft ↗︎. Lab sessions no longer expose navigator.modelContextTesting.

To list and run page tools:

  • Chrome DevTools: Use the Application > WebMCP panel in the live view of a Lab session or in the Kitesurf playground ↗︎.
  • AI agents: Start Chrome DevTools MCP with the --category-experimental-webmcp flag to add the list_webmcp_tools and execute_webmcp_tool tools.
  • CDP clients: Use the WebMCP CDP domain.

Subscribe to Browser Run crawl events

Browser Run crawl jobs can publish lifecycle events to Cloudflare Queues. Subscribe to started, updated, and finished events to track progress or trigger downstream processing without polling.

To create an account-level subscription, run the following command:

npx wrangler queues subscription create <QUEUE_NAME> --source browserRun --events crawl.started,crawl.updated,crawl.finished

For payload examples, refer to the Browser Run event schemas.

Browser Run adds session and DevTools methods to browser bindings

Browser Run browser bindings now provide typed methods for session management and DevTools operations. You can acquire a session, connect a browser client, create Live View URLs, manage targets, and close sessions without constructing HTTP requests.

The new acquire() and launch() methods also accept outboundByHost. This lets you route requests for selected hostnames through another Worker, including a Worker that adds authentication or reaches a private service.

const connection = await env.BROWSER.launch({
	outboundByHost: {
		"private.example.test": env.OUTBOUND,
	},
});
const connection = await env.BROWSER.launch({
	outboundByHost: {
		"private.example.test": env.OUTBOUND,
	},
});

Use connectSession(sessionId) when you need to acquire and connect in separate steps. The method returns a session-pinned webSocket Fetcher for a CDP client.

The binding also includes session methods for Live View, active sessions, session history, limits, session details, and cleanup. The nested devtools binding provides typed methods for browser version information, protocol descriptions, and target operations such as listing, creating, activating, and closing targets.

Refer to the Browser binding API documentation for method signatures and the outbound Worker feature guide for routing examples.

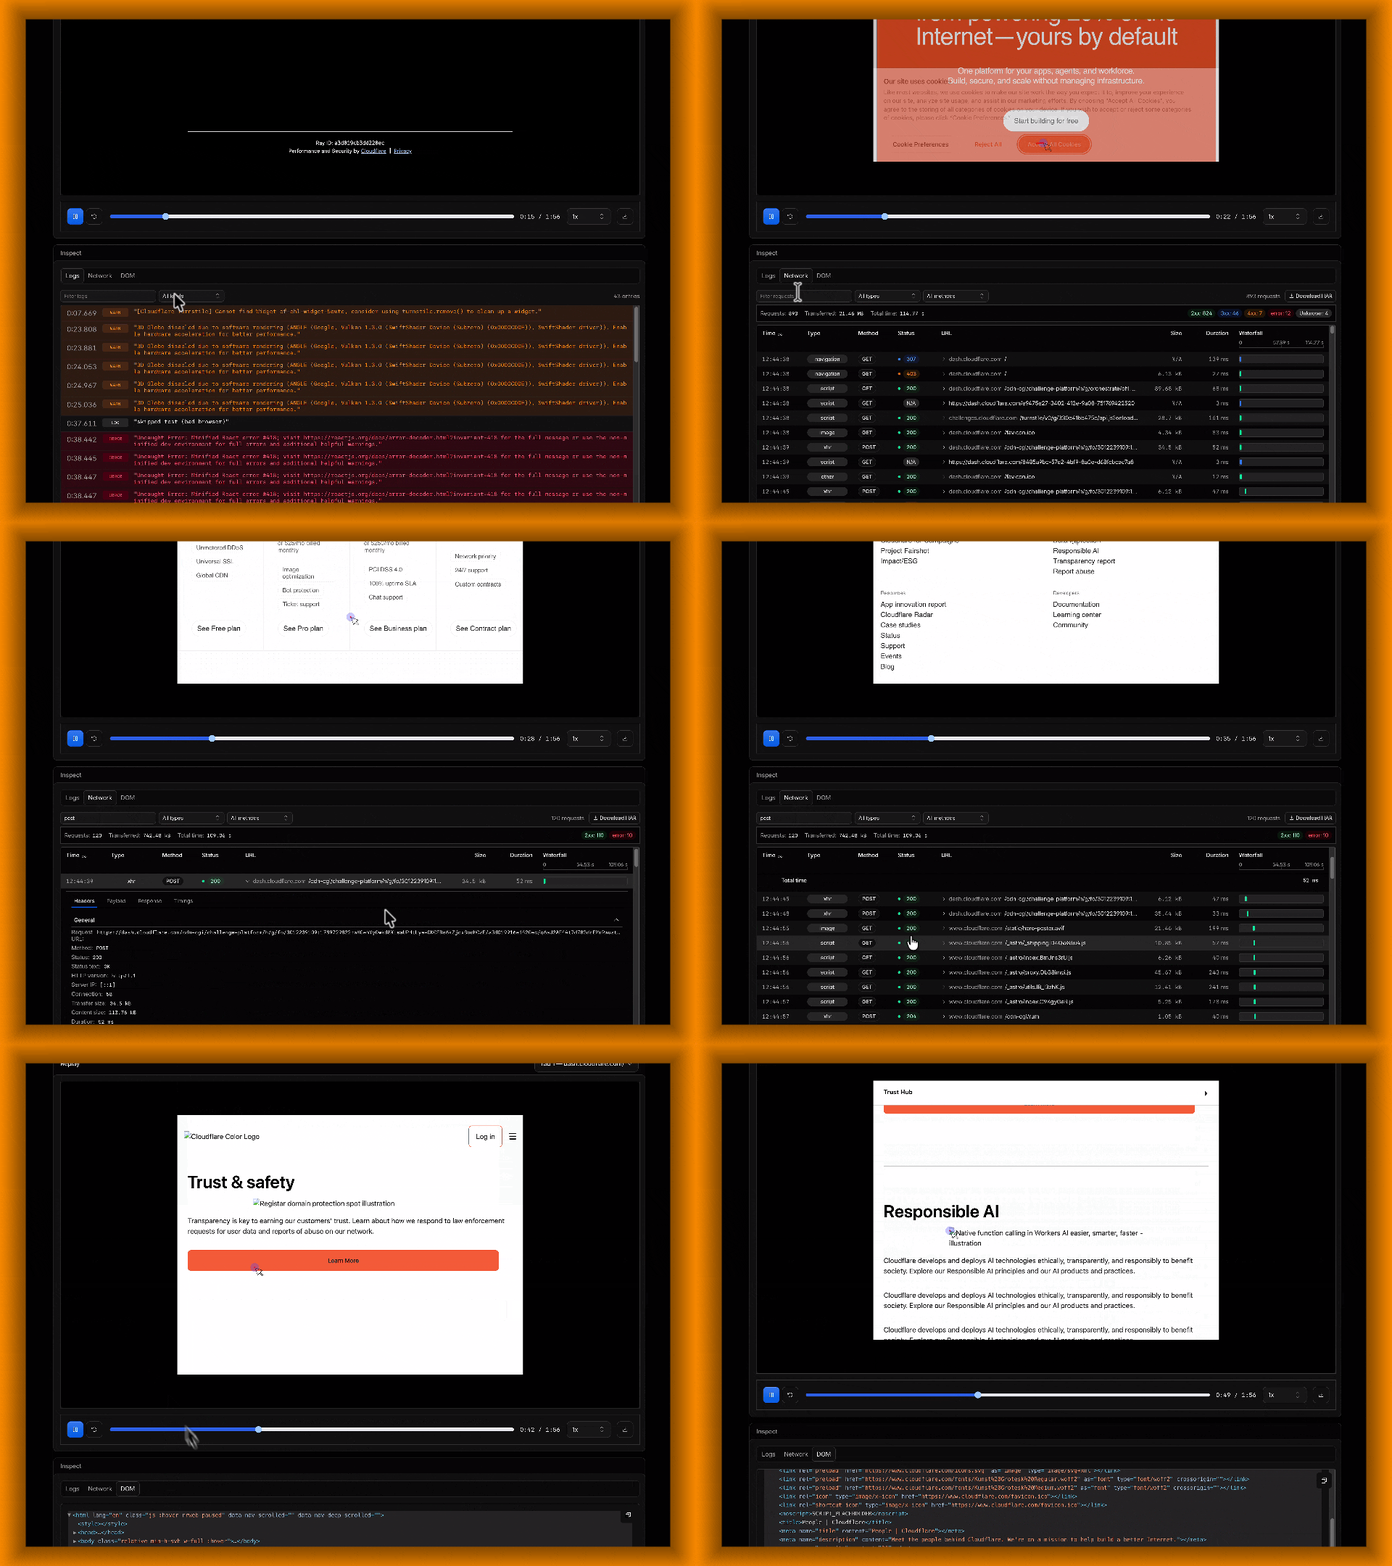
Inspect logs, network requests, and DOM in Session Recordings

Browser Run Session Recordings now include an Inspect panel, giving you more context to understand what happened during a browser session without having to reproduce it.

Inspecting logs, network requests, and the DOM in a Browser Run Session Recording

The Logs tab lets you search captured console output and filter messages by level. The Network tab shows each request's method, status, headers, payload, response, and timing waterfall, with the option to download the session's network activity as a HAR file.

You can also retrieve recorded network activity via API as raw JSON or a HAR file for use in your own debugging and analysis workflows.

The DOM tab provides an expandable view of the page structure at the end of the recording and lets you copy the reconstructed HTML. For sessions with multiple browser tabs, the Inspect panel updates to show data for the tab selected in the recording viewer.

To get started, enable recording when launching a browser session. After the session closes, open Browser Run > Runs in the Cloudflare dashboard ↗︎ and select the recording icon next to the session.

Refer to the Session recording documentation for setup instructions and current limits.

Reject busy synchronous inference requests

The rejectIfBusy option lets synchronous Workers AI inference requests fail when capacity is unavailable. Use it when your application should not wait in a capacity queue.

Pass the option as the third argument to the Workers AI binding:

const response = await env.AI.run(
	"@cf/google/gemma-4-26b-a4b-it",
	{
		messages: [{ role: "user", content: "Explain capacity queues." }],
	},
	{ rejectIfBusy: true },
);
const response = await env.AI.run(
	"@cf/google/gemma-4-26b-a4b-it",
	{
		messages: [{ role: "user", content: "Explain capacity queues." }],
	},
	{ rejectIfBusy: true },
);

For the native REST API, add the option to the request body:

curl --request POST \
  --url "https://api.cloudflare.com/client/v4/accounts/$ACCOUNT_ID/ai/run/@cf/google/gemma-4-26b-a4b-it" \
  --header "Authorization: Bearer $CLOUDFLARE_API_TOKEN" \
  --header "Content-Type: application/json" \
  --data '{
    "messages": [{ "role": "user", "content": "Explain capacity queues." }],
    "options": { "rejectIfBusy": true }
  }'

Refer to Reject busy requests for OpenAI-compatible usage and error behavior.

Prevent Unified Billing fallback for BYOK third-party providers

AI Gateway can now require credentials for third-party provider requests. Credentials must accompany the request or be stored on the gateway. This setting prevents fallback to Unified Billing with Cloudflare-managed credentials.

Turn on Require provider credentials in your gateway settings. To use the API, set byok_only to true in the request body of a PUT request to update the gateway:

{
	"byok_only": true
}

To require provider credentials for one third-party request, set the cf-aig-no-wholesale header to true. This header cannot relax the gateway setting.

Requests without applicable credentials then return an HTTP 400 response. Workers AI requests remain allowed, and the setting does not change their configured billing mode.

For configuration details and request-level controls, refer to Prevent Unified Billing fallback for BYOK third-party providers.

Control which hostnames Browser Run sessions can access

Browser Run now supports guardrails, which limit a browser session's HTTP and HTTPS requests to permitted hostnames.

Use guardrails when you need to:

  • Keep a browser workflow limited to a specific website and its subdomains.
  • Load only known third-party APIs, scripts, images, and fonts.
  • Generate a screenshot or PDF from HTML you provide while preventing it from loading external content.

Set guardrails when starting a session with Puppeteer, Playwright, or the REST API. With a browser binding named MYBROWSER, pass guardrails when launching Puppeteer:

import puppeteer from "@cloudflare/puppeteer";

export async function startGuardedSession(env) {
	return puppeteer.launch(env.MYBROWSER, {
		guardrails: {
			allowedDomains: ["example.com", "*.example.com"],
		},
	});
}
import puppeteer from "@cloudflare/puppeteer";

interface Env {
	MYBROWSER: Fetcher;
}

export async function startGuardedSession(env: Env) {
	return puppeteer.launch(env.MYBROWSER, {
		guardrails: {
			allowedDomains: ["example.com", "*.example.com"],
		},
	});
}

In addition to session guardrails, Browser Run now supports a read-only mode for Live View. Live View lets you watch and interact with an active Browser Run session in real time. A read-only link lets someone watch without clicking, typing, navigating, or running JavaScript.

To create a read-only link, set { mode: "readonly" } when generating the Live View URL. This setting affects only the person using that link. The session's hostname restrictions remain unchanged.

Refer to the guardrails documentation for more information.

Inspect Voice Agent turn latency and outcomes

@cloudflare/voice v0.4.0 now lets you inspect where each Voice Agent turn spends time and how it ends.

client.addEventListener("turnmetrics", (turn) => {
	console.log(turn.outcome, turn.turnTotalMs);
});

About the Voice package

The @cloudflare/voice package lets you build real-time voice agents with Cloudflare Agents. It streams microphone audio to an Agent over WebSocket, transcribes speech, runs your model through onTurn(), converts the response to speech, and streams audio back to the caller.

A turn moves through several stages:

User speaks -> speech-to-text -> model -> text-to-speech -> audio

Previously, the package's four aggregate metrics covered successful, non-empty speech turns. They did not show how failed, aborted, empty, or text turns ended.

Turn metrics

Each speech or text turn now produces a typed VoiceTurnMetrics summary with:

  • A turnId for correlating events from the same turn.
  • A terminal outcome such as completed, no_output, output_limit, content_filtered, model_error, tts_error, or aborted.
  • Timings for important stages, including speech-to-final-transcript, model-to-first-text, TTS-to-first-audio, and total turn duration.

These timings can overlap and are not additive. Timings for stages that a turn did not reach are omitted.

The latest summary is available through VoiceClient, useVoiceAgent(), and useVoiceInput(). Voice input includes only the speech and transcription timings it can measure.

If an agent produces no audio, you can now distinguish between the model returning no output, reaching an output limit, encountering content filtering, or failing.

Additional diagnostics

For local debugging, you can forward server lifecycle events to the browser console:

import { Agent } from "agents";
import { withVoice } from "@cloudflare/voice";

const VoiceAgent = withVoice(Agent, {
	diagnostics: {
		browserConsole: true,
	},
});
import { Agent } from "agents";
import { withVoice } from "@cloudflare/voice";

const VoiceAgent = withVoice(Agent, {
	diagnostics: {
		browserConsole: true,
	},
});

The browser console combines server lifecycle events with local microphone, connection, and playback events, including model start, first model text, first audio, and playback start. Diagnostics are off by default, and their event names and fields can change.

VoiceClient also exposes typed events for speech-to-text failures, connection errors, and model outcomes. The SDK removes known content fields and does not read arbitrary provider responses, but custom error messages must not contain sensitive data.

Install the release with a compatible Agents SDK version:

npm i @cloudflare/voice@^0.4.0 agents@^0.22.0

Refer to the Voice pipeline metrics and Voice Agent example ↗︎ to get started.

AI Gateway custom costs support cache tokens

AI Gateway custom costs now support cache-read and cache-write token rates. This lets custom cost metrics reflect negotiated cache pricing across providers.

Add per_cache_read_token or per_cache_write_token to the cf-aig-custom-cost header:

{
	"per_token_in": 0.000001,
	"per_token_out": 0.000002,
	"per_cache_read_token": 0.0000001,
	"per_cache_write_token": 0.0000005
}

Cache-token pricing activates when either cache rate is present. An omitted cache rate defaults to per_token_in. If both cache rates are omitted, AI Gateway preserves the existing input and output calculation.

Providers can include cache tokens within input tokens or report them separately. AI Gateway automatically accounts for these differences and prevents double-counting.

For more information, refer to Custom costs.

Run Cursor Cloud Agents on Cloudflare via self-hosted machines

Cursor self-hosted machines ↗︎ let you run Cursor Cloud Agents on Cloudflare. Each assigned session runs in its own isolated environment backed by Cloudflare Containers.

Cursor Cloud Agents environment selector showing the cloudflare-pool self-hosted machine pool

Cursor hosts the agent loop, inference, and planning. Cloudflare runs commands, file edits, repository operations, and other tools inside infrastructure that you control. The open-source Cursor Cloudflare Workers template ↗︎ deploys the Worker, Durable Object namespace, container application, R2 bucket binding, and cron trigger used by the integration.

To get started, refer to Run Cursor Cloud Agents on Cloudflare via self-hosted machines.

AI Gateway consolidates monthly usage invoice line items and standardizes model names

AI Gateway monthly usage invoices, issued at the beginning of each month for the previous month's usage, now show a single total cost for each model. These invoices no longer break out input and output token quantities and unit prices into separate line items. This change does not apply to invoices for AI Gateway credit purchases.

For example, an invoice that previously included these separate line items:

  • anthropic claude-haiku-4-5-20251001 Input Tokens: 40,000 tokens at $0.000001 ($0.04)
  • anthropic claude-haiku-4-5-20251001 Output Tokens: 24,000 tokens at $0.000005 ($0.12)

The updated invoice includes one line item: anthropic/claude-haiku-4.5: $0.16.

AI Gateway has also standardized model names across invoices and logs. Model variants that previously appeared with provider-specific version suffixes now use a consistent provider/model identifier.

For more information, refer to the Unified Billing documentation and AI Gateway logging documentation.

Crawl endpoint now respects the Content Signals `use` directive

The /crawl endpoint now respects the use directive of the Content Signals ↗︎ standard, letting site owners express the maximum level at which their content may be used.

You can declare your intended level with the new contentUse parameter. Allowed values, from least to most permissive, are reference and full, and the default is full. If a target site's robots.txt sets a use level that is more restrictive than your declared contentUse, the crawl request is rejected with a 400 error.

curl -X POST 'https://api.cloudflare.com/client/v4/accounts/{account_id}/browser-rendering/crawl' \
  -H 'Authorization: Bearer <apiToken>' \
  -H 'Content-Type: application/json' \
  -d '{
    "url": "https://example.com",
    "contentUse": "reference",
    "formats": ["markdown"]
  }'

For more information, refer to Content Signals in the /crawl endpoint documentation.

Z.ai GLM-5.3 now available on Workers AI

@cf/zai-org/glm-5.3 is now available on Workers AI. It is Z.ai's flagship agentic coding model, built for long-running, tool-driven development workflows rather than single-turn chat.

GLM-5.3 uses the same base model as GLM-5.2, with every gain coming from post-training. The results are substantial on coding and agentic benchmarks: Z.ai reports ↗︎ a 50% improvement over GLM-5.2 on its in-house Z.ai Code Bench, and calls GLM-5.3 the most capable open-weights model for coding. On public benchmarks, it scores 88.2 on Terminal Bench 2.1 (up from 81.0), 28.3 on Terminal Bench 3.0 — open-source state of the art, up from 4.6 — 66.9 on DeepSWE (up from 46.2), 78.1 on FrontierSWE (up from 67.5), and 42.5 on SWE-Marathon (up from 19.4). It is also the top-scoring model in Z.ai's comparisons on CyberGym for vulnerability discovery (84.5) and on long-horizon automation tasks like AutomationBench (48.2).

The price-to-performance ratio is the compelling part. On Workers AI, GLM-5.3 costs the same as GLM-5.2 — $1.40 per M input tokens, $0.26 per M cached input tokens, and $4.40 per M output tokens — while roughly doubling GLM-5.2's scores on long-horizon benchmarks like SWE-Marathon, and improving them by more than 6x on Terminal Bench 3.0.

GLM-5.3 requires the Workers Paid plan or prepaid AI Gateway credits.

Use GLM-5.3 through the Workers AI binding (env.AI.run()), the REST API, the OpenAI-compatible endpoint, or AI Gateway.

For more information, refer to the GLM-5.3 model page and pricing.